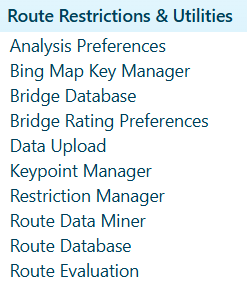
Restriction Manager
Use the Restriction Manager page to find, create, review, and maintain a list of Restrictions that may be applied to portions of a route or to a permit.
Find Restrictions
Use the Restriction Information to Query Restrictions by route, location, type, or date. You can then Display the results on the Map.
- Navigate to the Restriction Manager screen by clicking the My Admin link then choosing Restriction Manager from the Route Restrictions and Utilities pane.
- When the Restrictions page opens, click Query button to view the restrictions.
Note: Users can set other query parameters before clicking the Query button.
- Scroll down to the bottom of the page and select the desired restriction from the table then click the Display button.
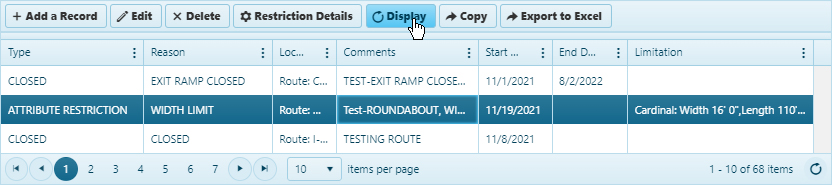
Note: If the desired restriction is not visible on the table, use the Query features on the Restriction Information pane.
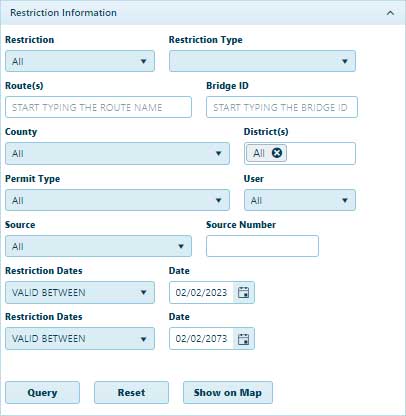
- Choose which variable or set of variables is most likely to return the desired result:
- Expand the Restriction drop-down then choose from the available options.
- If you choose Category or Reason, the adjacent drop-down will conform to present relevant options.
- Enter the name of the Route in the field provided; while you type, the system is already searching the database for matching information. Choose from the available options.
Note: Most of the time, you will need to enter no more than three letters or digits before the system begins presenting you with likely options. Expand the County drop-down and choose from the available options and/or enter a District number in the field provided.
- Define a period to restrict results by choosing a date (or a pair of dates) and the appropriate option from the drop-down.
- Click the Query button to execute your search.
- Click the Display on Map button to view the locations impacted by the restrictions.
Create a Restriction
-
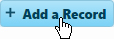
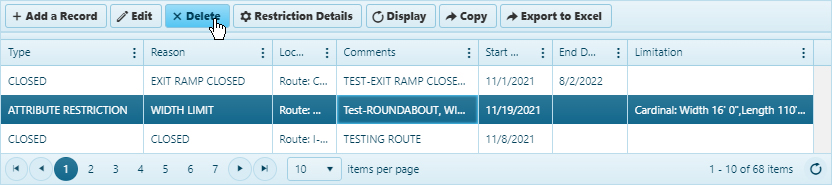
To create a new restriction, scroll down to the table at the bottom of the page and click the Add a Record button.
-
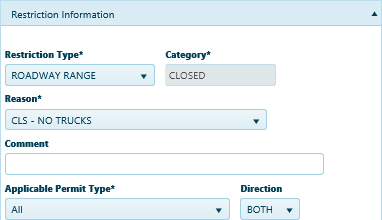
Expand the Restriction Type drop-down and choose from the available options then enter a Category in the field provided. Be sure to choose a Reason and to identify the Applicable Permit Type before entering a name for the restriction in the Comment field (this will help you find it on the table should you need the record again later).
-
Define the impact zone of the restriction.
-
-
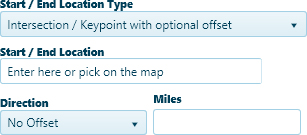
Expand the Start/End Location type drop-down and
-
-
Your cursor is now equipped to define a start location, mark points of transition, and designate your destination by clicking on the map.
-
Or, you can enter the first few characters of a name (ex, I-90, MN-, or Lon for Lone Oak). Give the system a few seconds, and it will present you with recognized locations that begin with the characters you’ve entered. Choose from the available options and strike the Enter key to include the location in the restriction.
-
Click the Add button to include a location in the restriction.
-
Click the Clear Last button to remove the last entered location from the restriction.
-
Establish the duration of a restriction by clicking the calendar icon and choosing a From and a To date.

-
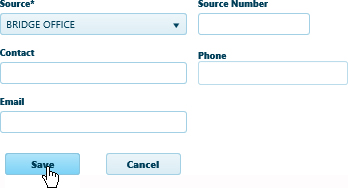
Expand the Source drop-down and choose from the available options then click the Save button to include the new restriction in the database, or click the Cancel button to close the dialog without adding the restriction.
Update a Restriction
-
Scroll down to the bottom of the page and select the desired restriction from the table then click the Edit button.

-
Scroll up to the Restriction Information pane and make your changes then click the Update button (to include any new/altered information in the database) or click Cancel (to close the dialog without editing the restriction).
Delete a Restriction
-
Scroll down to the bottom of the page and select the desired restriction from the table.
-
Click the Delete button to remove the record from the database.
Tools
-
Display Restrictions
–
Use the Display Restrictions function to search the database for Clearances, Load Rating tolerances, and/or Restrictions and then to present the results of that search on the map.
-
Find Intersection
–
Use the Find Intersection function to search the database for intersections and then to present the results of that search on the map.
-
Find Item
–
Use the Find Item function to search the database for locations and then to present the results of that search on the map.
-
Find Route
–
Use the Find Route function to search the database for designated routes and then to present the results of that search on the map.
-
Find Structure
–
Use the Find Structure function to search the database for bridges and then to present the results of that search on the map.
-
Map Options
–
Use the Map Options to control the color scheme of selected map items.
-
Route Information
–
Use the Route Information function to view route attributes stored in the database.
-
Manage Input
–
Use the Manage Input panel to add a source or reason to the drop-down. The list of current sources/reasons is displayed. You can add a new source/reason or delete an existing source/reason.
Manage Input
Use the Manage Input panel is used to maintain sources and reason. The list of current sources/reasons is displayed. You can add a new source/reason or delete an existing source/reason.